9 minutes
Setting up Gqrx Software Defined Radio on Ubuntu 18.04 Using Remote Raspberry Pi SDR with rtl_tcp
Gqrx is an open source Linux based Software Defined Radio (SDR) built using GNU Radio with a Qt graphical interface. When paired with any of a number of SDR hardware devices, Gqrx can be used to receive and listen to various radio signals.
In this post, I will describe how to use Gqrx on a computer running Ubuntu 18.04 to listen to radio signals pulled in by an inexpensive $25 NooElec NESDR Mini+ RTL2832U USB device attached to a Raspberry Pi 3.
Separating the SDR hardware (RTL2832U and Raspberry Pi) from the SDR software (Gqrx) allows me to mount the hardware in my attic (where the radio can be easily attached to one of several antennas) and listen from anywhere in the house without running antenna leads.

Installing and Configuring the Raspberry Pi
Install Operating System
To setup the raspberry pi, grab the lasted raspbian image and burn it to a fast SD card, boot the Pi up, and run through the initial setup tool. The Raspberry Pi Website provides step by step instructions for this. See the article Setting up your Raspberry Pi. At the time I did this, “Jessie” was the latest raspbian version.
Configure SSH and Set Static IP Address
Once you’ve got the Pi up and running, you may want to enable SSH and set a static IP address. SSH will enable you to use the Pi ‘headless’ without a monitor and keyboard. The static IP address will simplify use of Gqrx by eliminating the need to update the I/O configuration with a new IP address every time the router decides to issue a new dynamic IP address to the Pi.
To enable SSH, see the article SSH Secure Shell Access on the Raspberry Pi Foundation’s website.
To establish a ‘static’ IP address, you have a few options. If you are familar with your router’s DHCP settings, the easiest method is to have it always issue the same IP address for your Raspberry Pi. This way, you will not need to make any changes to the Pi. Alternatively, you can configure Raspbian to use a true static IP address. There are many guides on doing this. See, for example, [Raspbian Jessie and Stretch Static IP Setup](https://www.abelectronics.co.uk/kb/article/31/raspbian-jessie-or-stretch-static-ip-setup “Raspbian Static IP Setup - “AB Electronics (UK) Knowledge Base”).
Install RTL-SDR
Finally, you’ll want to add the STL-SDR package to your Raspberry Pi. To do this, you’ll need to install a few dependencies, use git to download the rtl-sdr software code, compile the code with make, test it, and then set up rtl_tcp to start automatically on boot.
Install rtl_tcp dependancies
Before you install the RTL drivers, you will have to install the following dependencies by typing the following commands in terminal window at the prompt.
$ sudo apt-get install -y git cmake libusb-1.0-0.dev build-essential
Download and build rtl_tcp
Now we are ready to install the rtl-sdr software. Open a terminal on your pi and execute the following commands:
$ cd ~
$ git clone git://git.osmocom.org/rtl-sdr.git
$ cd rtl-sdr/
$ mkdir build
$ cd build
$ cmake ../
$ make
$ sudo make install
$ sudo ldconfig
Connect the RTL dongle hardware and test
Before plugging in the RTL dongle to the Pi’s USB port, we’ll need to “Blacklist” the TV driver that is associated with this device. (By default, ubuntu will treat the RTL2832U as a TV, not a radio, receiver.) To black list, execute the following commands in the terminal:
$ sudo cp /home/pi/rtl-sdr/rtl-sdr.rules /etc/udev/rules.d
$ sudo nano /etc/modprobe.d/rtl-sdr-blacklist.conf
In the nano editor window, add the following text to the file:
blacklist dvb_usb_rtl28xxu
blacklist e4000
blacklist rtl2832
To exit nano and save the file, press Ctrl+x and type yes when prompted to save.
Now plug in your rtl-sdr device. You can confirm that it works by issuing the following command:
$ rtl_test -t
You should see something like the following:
Found 1 device(s):
0:  Generic, RTL2832U, SN: #################

Using device 0: Generic RTL2832U
Found Rafael Micro R820T tuner
Supported gain values (14): -1.0 1.5 4.0 6.5 9.0 11.5 14.0 16.5 19.0 21.5 24.0 29.0 34.0 42.0
Sampling at 2048000 S/s.

Info: This tool will continuously read from the device, and report if samples get lost. If you observe no further output everything is fine.

Reading samples in async mode... +++++++++++++++++++++
Type Ctrl+c to stop the test.
Start rtl_tcp and configure a service to start it at boot
To start the rtl server type rtl_tcp -a plus the ip address of your Pi. For example:
$ rtl_tcp -a 192.168.100.50 &
While you could log into the Pi and restart rtl_tcp manually everytime it reboots, you may want to set up the Pi to do this automatically. To do so, create a script for the autostart service and then enable it so that it starts automatically.
Open a terminal and enter the following command:
$ sudo nano /etc/systemd/system/rtl_tcp.service
In the nano editor, enter the following:
[Unit]
Description=SDR rtl-sdr tcp server
After=network-online.target

[Service]
Type=simple
ExecStart=/home/pi/rtl-sdr/build/rtl_tcp.sh
ExecStop=killall rtl_tcp
Restart=on-failure
RestartSec=10
User=pi

[Install]
WantedBy=multi-user.target
Exit nano by typing Ctrl+x and then saying ‘yes’ when prompted to save.
Change the permissions on the file to allow it to be executed:
$ chmod 755 /etc/systemd/system/rtl_tcp.service
Finally, set the service to start automatically and then reboot:
$ sudo systemctl enable /etc/systemd/system/rtl_tcp.service
$ sudo reboot
After rebooting, the rtl_tcp service will start automatically. You can confirm the service started by issuing the following command from the Pi’s command line:
$ netstat -a | grep 1234
You should get a line back that looks something like this: tcp 0 0 192.168.100.50:1234 : LISTEN
With the Raspberry Pi setup, we are ready to move on to Gqrx.
Installing Gqrx
Ubuntu include Gqrx packages in its distributions. As Gqrx relies on gnuradio, you’ll need to install it too. With that said, the version of Gqrx included in the distribution is usually a bit dated. Therefore, you may wish to install Gqrx from it’s own PPA instead.
If you want to install the Ubuntu version:
Open a terminal window on your desktop (or laptop) computer running ubuntu and execute the following command:
$ sudo apt-get install gnuradio gqrx
If you want the lastest version:
To use the latest version, you can use the packages available from Gqrx. To install this version, see the Gqrx DSR article Install Gqrx SDR on Ubuntu Linux.
After installation is complete, you should find an entry in your Appication Launcher menu. If you are on a kubuntu system like I am, you’ll find Gqrx on the KMenu under Applications > Internet. (As this didn’t make a lot of sense to me, I created an SDR menu item and moved Gqrx under that). The application can also be launched from the terminal:
$ gqrx &
Configuring Gqrx to Use the rtl_tcp Feed
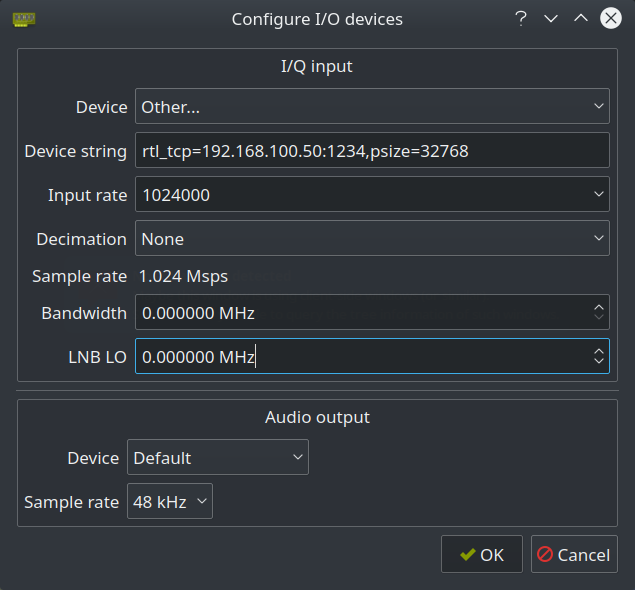
The first time the Gqrx starts, you’ll be prompted to configure and I/O device. To configure the rtl_tcp feed, specify the following:

- Device”: Select Other…
- Device string: Set this to rtl_tcp=192.168.100.50:1234,psize=32768 where 192.168.100.50 is the ip address of your Raspberry Pi. The psize=32768 is an optional argument that sets the payload size. It is not completely clear to me, but it appears that psize is the same as the buflen argument that would be used if Gqrx was running on the same hardware as the RTL hardware. See the discussion under Gqrx Supported Hardware for RTLSDR for details. For other optional Device string arguments, see OsmoSDR Support Wiki.
- Input rate: This is the sampling rate in Hz. 2048000 is the default, I’ve cut it down to 1024000.
- Decimation: Leave as None.
- Sample rate: This field will automatically take your Input Rate and convert it to a sample rate in Msps.
- Bandwidth: This setting refers to analog bandwidth, but this feature is not supported on RTL devices. Leave this field blank.
- LNB LO: In the field, you can specify a frequency adjustment if you are using an UpConverter. (An UpConverter, such as the NooElec Ham-it-up, allows you to shift the range of the SDR hardware up so that you can listen to shortwave, Ham, and other frequencies that are typically lower than what an RTL based SDR will support.) If you are using an Upconverter, you would enter the offset frequency here. For example, the Ham-it-up shifts the frequency 125 MHz, so you would specify -125.000000 MHz for this value. However, in this case I do not have an upconverter connected, so I will leave this value at 0.
- Audio output Device: This is the device on your local computer to output sound to.
- Audio output Sample rate: This is the sample rate that the local computer will play audio at. The default value is 48 kHz.
Once the configuration parameters are specified, click OK. You should now be able to tune in and listen to the radio.
Testing and fine tuning the system
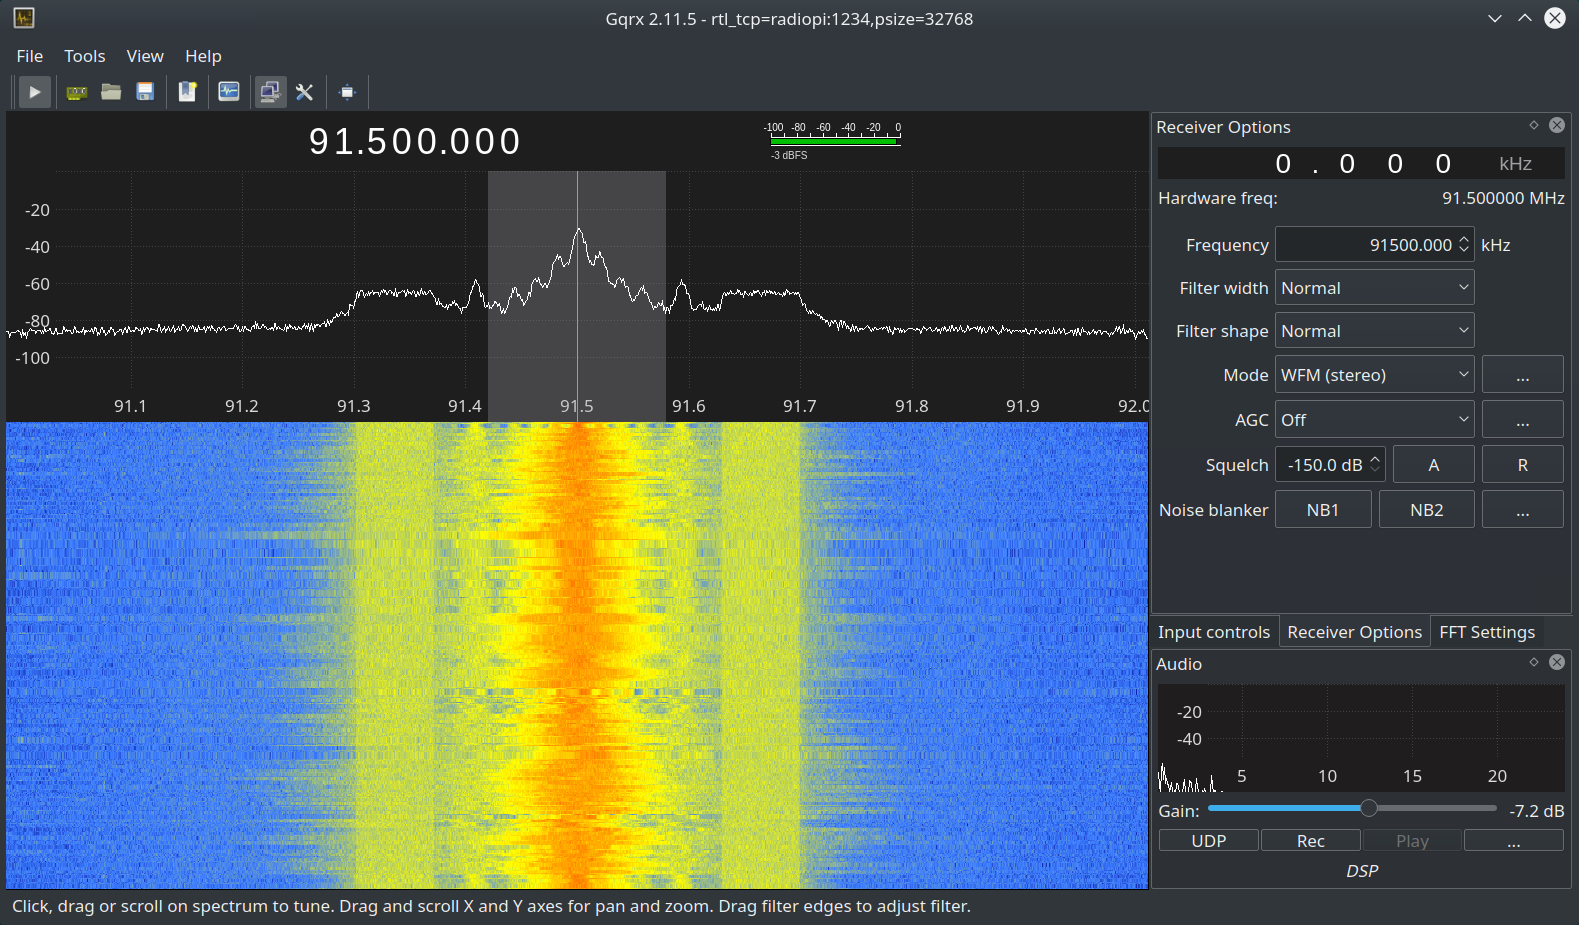
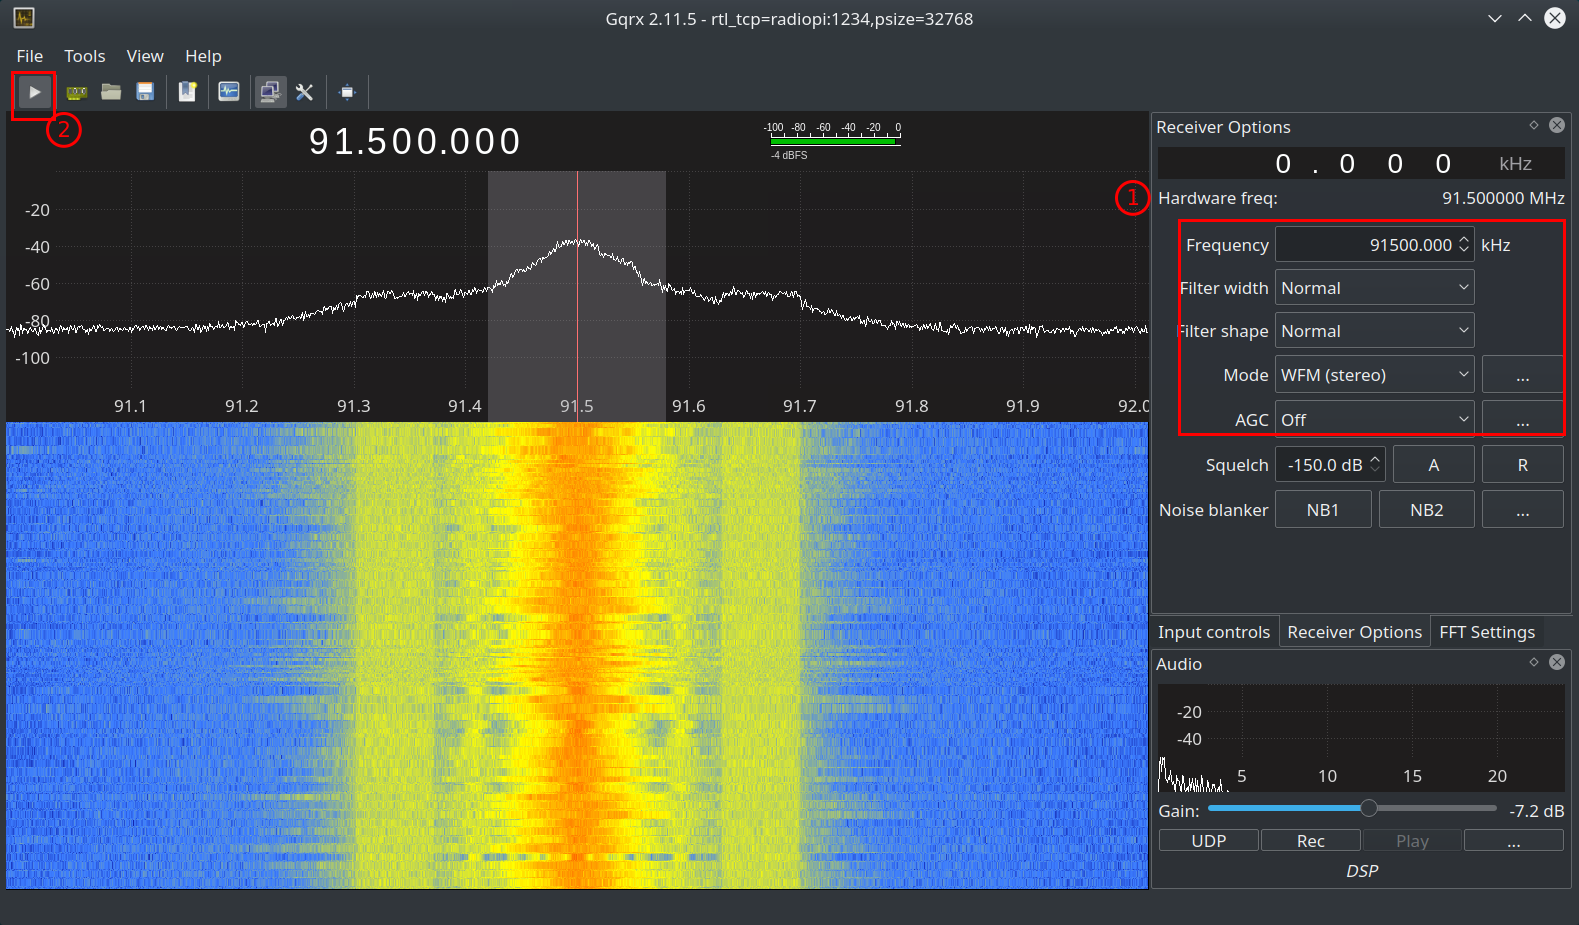
To test that everything is working correctly, try tuning to a local FM radio station. In my case, I’ll tune into 91.5 MHz FM. To do this, I first entered the frequency in the hardware frequency field (to convert from MHz to KHz, multiply by 1000… so 91.5 MHz x 1000 = 91500.000 Khz). I also changed the mode to Wide FM (stereo) to let Gqrx know how much of the spectrum to include when processing the signal, the the filter widths to normal and turned off Automatic Gain Control (AGC). To start the stream, click the play button (see screenshot, below).

At this point, you should see the waterfall start to fill-up and the auto start to play. Ideally, the center of the signal should be centered on the red line. However, RTL tuners, especially older models not specifically designed for RTL radio use, are subject to frequency drift. This can be easily corrected. To do so, you can made adjustments under the Input Controls.
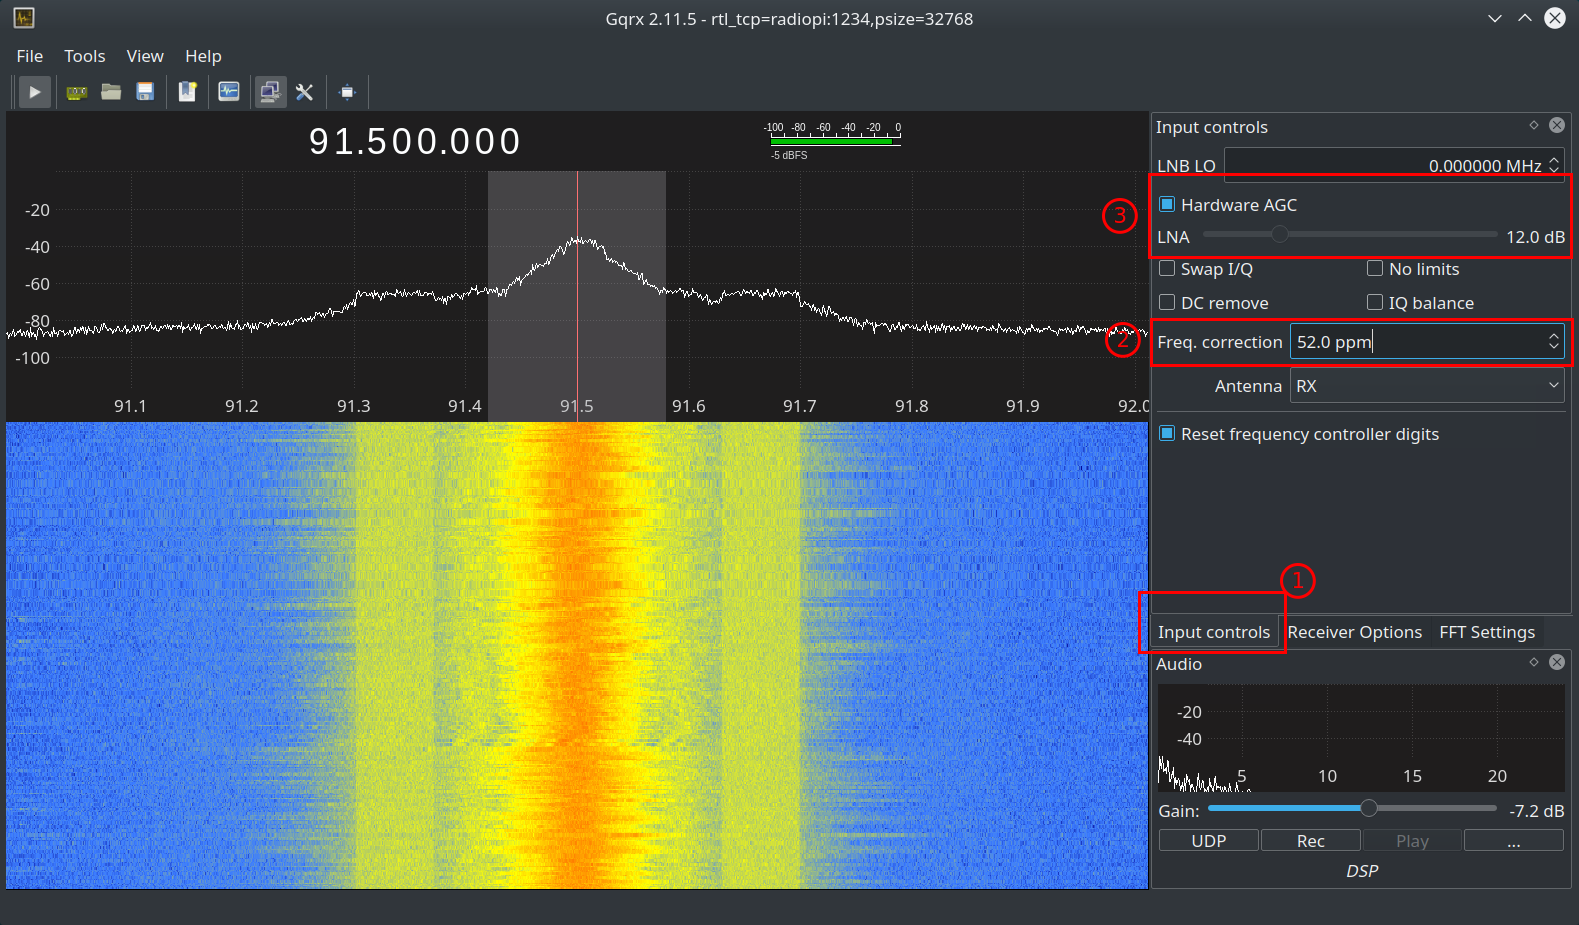
First, select Input Controls on the side bar (see screenshot, below). Second, enter a frequency correction factor. For most ‘generic’ RTL dongles, start out with something relatively small, say 10 ppm or 20ppm and then raise or lower the ppm until the red line is centered on the center of the radio signal on the waterfall. Note that this value might drift over time as your RTL ‘warms-up’. Therefore, you may want to wait 10 or 20 minutes and then make ‘final’ adjustments. Once the dongle warms up, this correction factor should be pretty stable. (Tip: if you have multiple RTL dongles, you might want to label each one with its PPM correction factor; it will likely be different for each dongle).
Finally, if you are having trouble getting a clear strong signal, you may also want to play around with the ‘gain’. In the screenshot (below), I am using the hardware based automatic gain control. However, you can uncheck this box and experiment with setting the gain control manually. For FM signals, the hardware based gain control seems to work fine for me, but for other types of signals, fiddling with this setting can improve signal processing.

Conclusion
If you’ve been following along with this article, should now have a remote Raspberry Pi based hardware radio with the ability to remotely tune in and process it’s signals on a remote laptop (or desktop) using Gqrx software. Happy listening!